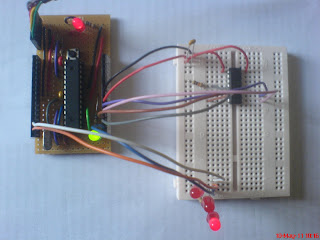
This post describes how to use an Arduino (or compatible, as described earlier) to program an AVR, specifically the ATtiny84. I used this page as a starting-point, although it talks about programming an ATmega, the principle is the same.
I chose the ATtiny because it is a convenient package for standalone applications (14-pin DIL) yet provides 8k of flash and lots of I/O (up to 12 pins).
The first step is to download mega-isp into the Arduino IDE and upload it to the Arduino, thus turning it into an ISP. Then wire up the ATtiny as shown in the picture above. The connections between the Arduino and the ATtiny are as follows:
| Arduino | ATtiny | ATMega | Name |
|---|---|---|---|
| 14 | 1 | 7 | Vcc |
| 16 | 14 | 8 | Gnd |
| 13 | 9 | 19 | SCK |
| 12 | 8 | 18 | MISO |
| 11 | 7 | 17 | MOSI |
| 10 | 4 | 1 | /RESET |
Also connect the reset pin to Vcc via a 10k resistor and don't forget the 100nF capacitor between Vcc and Gnd.
Status LEDs can optionally be connected as follows:
| Arduino | Function |
|---|---|
| 9 | Heartbeat |
| 8 | Error |
| 7 | Programming |
Out of the box, the Arduino IDE supports only ATmega chips. To rectify this, download and install arduino-tiny. Then start the IDE, select Tools > Board > ATtiny @ 1MHz, and compile the sketch to be written to it.
Next, open a shell, find the IDE's working directory (on Linux this is somewhere like /tmp/build8471417854754086173.tmp) and cd into it. Run the following command:
$ avrdude -P /dev/ttyUSB0 -b 19200 -c avrisp -p t84 -U flash:w:Blink.cpp.hex:i
This command writes the output of the compiler (Blink.cpp.hex) at the given baud-rate (19200) to the ISP on the specified port (/dev/ttyUSB0) for the specified part (t84, for an ATMega, m328p). If successful, its output should look something like this:
$ avrdude -P /dev/ttyUSB0 -b 19200 -c avrisp -p t84 -U flash:w:Blink.cpp.hex:i

avrdude: please define PAGEL and BS2 signals in the configuration file for part ATtiny84
avrdude: AVR device initialized and ready to accept instructions

Reading | ################################################## | 100% 0.04s

avrdude: Device signature = 0x1e930c
avrdude: NOTE: FLASH memory has been specified, an erase cycle will be performed
   To disable this feature, specify the -D option.
avrdude: erasing chip
avrdude: please define PAGEL and BS2 signals in the configuration file for part ATtiny84
avrdude: reading input file "Blink.cpp.hex"
avrdude: writing flash (752 bytes):

Writing | ################################################## | 100% 1.53s

avrdude: 752 bytes of flash written
avrdude: verifying flash memory against Blink.cpp.hex:
avrdude: load data flash data from input file Blink.cpp.hex:
avrdude: input file Blink.cpp.hex contains 752 bytes
avrdude: reading on-chip flash data:

Reading | ################################################## | 100% 1.35s

avrdude: verifying ...
avrdude: 752 bytes of flash verified

avrdude: safemode: Fuses OK

avrdude done.  Thank you.
The ISP's LEDs will blink during this process and the ATtiny will restart when the process has completed, running the newly uploaded sketch.
Note that this does not burn the Arduino bootloader to the chip. Modifications to the sketch require this procedure to be repeated, which is rather laborious.
No comments:
Post a Comment